This is a tutorial for DMA fuser.That's why your DMA cheats program works on your radar PC, but the mainPC can view the DMA cheats.After you buy our DMA fuser device, they will include three HDMI 2.1 cables, a type C cable and a DC12 V power cable in your package.

Make sure your cable and monitor equipment are working properly.There are five ports on the fusionizer type C port.If you are using the fusionizer for the fist time, please connect the type C USB cable to any of USB port on your main PC.It's the equivalent of a DMA cards firmware flash port.
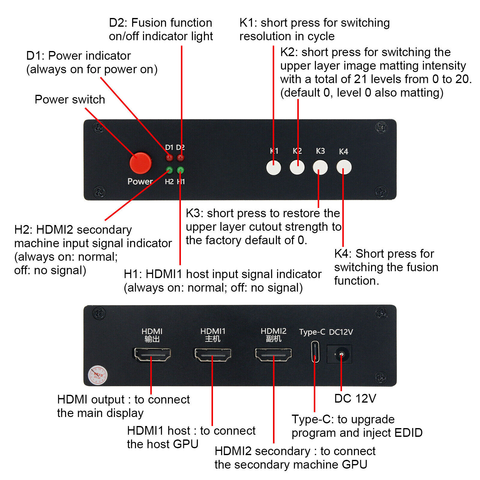
This is a diagram of the fusion light

The K light buttons can switch your monitor's resolution, but the fuser only supports a maximum refresh rate of 240HZ at 1080 resolution and 144HZ at 2440 resolution.
The K light button allows you to adjust the fusion strength of your fusion to make it more compatible with your cheat program.Before doing so please set your radar PC wallpaper to all black.
K3 is a light button that we won't use, so we won't talk about it.
The K4 light button allows us to switch back and forth between computers that need to work with the fusion, make sure your cables are plugged in correctly.It's switching back and forth between my two monitors.All we need to do is press the K4's light button three times to put it into fusion mode, and will be able to use the DMA cheat as normal.
Now, let's talk about how to properly access HDMI cables

The meaning of the first HDMI port is HDMI input port, which is the interface for your main PC monitor.Please unplug the HDMI cable or display cable from your main PC monitor and connect one of the three HDMI cables from the hub to the HDMI input port on your monitor.
If your monitor has a display port, please purchase a display to HDMI cable.You need to plug in the HDMI connector on the DMA fuser device, the cable is connected to the monitor, and that's it.Please connect the HDMI cable to your main PC's video card connector, that is the GPU.This is the most important step.The third HDMI port.
After connecting main PC graphics card, please connect your radar PC monitor HDMI port.If this is your first time to use it, please connect the type C cable to any USB port on the main PC, and connect the power supply.If you don't even know how to connect the power supply, I suggest you don't cheat and go play plants versus zombies.
When everything is connected, turn on your two computer.You will see all four lights on the Fusion unit are on.If any of the lights are not on, then you have connected the cables wrongly.
Now open your main PC, open the software sent to you by the after sales customer service, get the EDID code of your monitor, and then brush in the firmware.Select the first line of code, then click on the upper right corner file Save.You can put it in any location you can find.Make sure your TIPC cable is successfully connected to the fusionizer.Open you manage your devices. You can see CH340 it's worth noting that it's not a Kmbox, actually, it's a fusion.Then open the flashing tool, flash your firmware, reboot your computer, and your fusion will set up.
For any Direct Memory Access DMA technical support, Please contact us:steams360.com@gmail.com

